When you installed Sitecore 9 and above, setup should finished with two websites. Normally names like "*.dev.local" and "*_xconnect.dev.local".
Lets take an example of Habitat site.
"habitat.dev.local" runs on port 80 and 443 while "habitat_xconnect.dev.local" runs on HTTPS using 443 port. For running on HTTPS, we have to bind it to certificates.
Some of the questions about certificates that come to our mind are
How to bind/change certificates to these websites
Select website -> Click on Bindings -> Select Site running on port 443 and click on Edit -> Click on View button to view SSL certificate.
or change certifcates from available SSL certificates dropdownlist list.
Where to find certificates
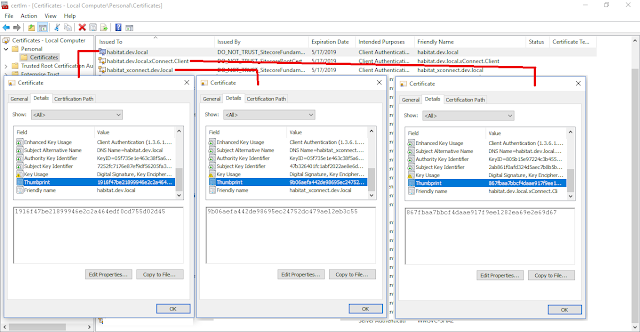
For this click on Start -> search for "Manage Computer Certificates" -> This should open "certlm" -> Expand Personal -> Select "Certificates" -> Select your website and double click website -> This should open "Certificate" window -> Select "Details" tab -> Check "Thumbprint" property as shown below
You will get three certificates for each Sitecore 9 instance.
We can guess what are "habitat.dev.local" and "habitat_xconnect.dev.local", but what is "habitat.dev.local.xConnect.Client"?
Sitecore 9 is like client-server model where client is Sitecore webiste "habitat.dev.local" whereas xConnect instance "habitat_xconnect.dev.local" act as a server.
So if client want to communicate with server over secure HTTPS channel, they must agree with one thumbprint key. This thumbprint key is specified in new certificate "habitat.dev.local.xConnect.Client".
Where to specify thumbprint values for Sitecore and xConnect instances?
You have to specify thumbprint value of "habitat.dev.local.xConnect.Client" at below locations.
For Sitecore website instance
Open "ConnectionStrings.config" from "C:\inetpub\wwwroot\habitat.dev.local\App_Config" and check below keys for client certificate thumbprint value
For xConnect instance
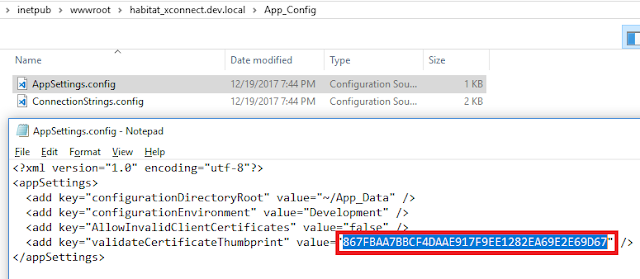
Open "AppSettings.config" from "C:\inetpub\wwwroot\habitat_xconnect.dev.local\App_Config" and check "validateCertificateThumbprint" key value.
Certificate is complex subject but I hope these details helps you to understand certificates role in Sitecore 9. Stay tuned for more Sitecore related articles.
Till that happy Sitecoring :)
Lets take an example of Habitat site.
"habitat.dev.local" runs on port 80 and 443 while "habitat_xconnect.dev.local" runs on HTTPS using 443 port. For running on HTTPS, we have to bind it to certificates.
Some of the questions about certificates that come to our mind are
- How to bind certificates to websites?
- How to change certificates to websites?
- Where to find certificates?
- Where to specify their thumbprint values?
How to bind/change certificates to these websites
Select website -> Click on Bindings -> Select Site running on port 443 and click on Edit -> Click on View button to view SSL certificate.
or change certifcates from available SSL certificates dropdownlist list.
 |
| SSL Certificate in IIS |
Where to find certificates
For this click on Start -> search for "Manage Computer Certificates" -> This should open "certlm" -> Expand Personal -> Select "Certificates" -> Select your website and double click website -> This should open "Certificate" window -> Select "Details" tab -> Check "Thumbprint" property as shown below
 |
| Available certificates in machine |
You will get three certificates for each Sitecore 9 instance.
- habitat.dev.local
- habitat.dev.local.xConnect.Client
- habitat_xconnect.dev.local
We can guess what are "habitat.dev.local" and "habitat_xconnect.dev.local", but what is "habitat.dev.local.xConnect.Client"?
Sitecore 9 is like client-server model where client is Sitecore webiste "habitat.dev.local" whereas xConnect instance "habitat_xconnect.dev.local" act as a server.
So if client want to communicate with server over secure HTTPS channel, they must agree with one thumbprint key. This thumbprint key is specified in new certificate "habitat.dev.local.xConnect.Client".
Where to specify thumbprint values for Sitecore and xConnect instances?
You have to specify thumbprint value of "habitat.dev.local.xConnect.Client" at below locations.
For Sitecore website instance
Open "ConnectionStrings.config" from "C:\inetpub\wwwroot\habitat.dev.local\App_Config" and check below keys for client certificate thumbprint value
- xconnect.collection.certificate
- xdb.referencedata.client.certificate
- xdb.marketingautomation.reporting.client.certificate
- xdb.marketingautomation.operations.client.certificate
| Thumbprint value in connectionstring.config |
For xConnect instance
Open "AppSettings.config" from "C:\inetpub\wwwroot\habitat_xconnect.dev.local\App_Config" and check "validateCertificateThumbprint" key value.
 |
| Thumbprint value in AppSettings.config |
Certificate is complex subject but I hope these details helps you to understand certificates role in Sitecore 9. Stay tuned for more Sitecore related articles.
Till that happy Sitecoring :)

