If you are developing Sitecore projects and for SPRINT demo
to client we generally host it publically. Your development, demo, QA or test websites
should be access publically but only to handful of people. One simple way is
to keep login screen before accessing any page for that session.
We have to develop this login feature in such a manner that it will be enable disable easily by single setting.
We have to develop this login feature in such a manner that it will be enable disable easily by single setting.
How can we implement this login screen on Sitecore website?
For this we will create some files in Visual Studio and
items in Sitecore.
In Visual Studio
In HELIX based project I like to keep login related files in
“Sitecore.Feature.Navigation” feature.
Create one model "UserLogin.cs" in
"Sitecore.Feature.Navigation" as
using System;
using System.Collections.Generic;
using System.Linq;
using System.Web;
namespace Sitecore.Feature.Navigation.Models
{
public class UserLogin
{
public string UserName
{ get; set; }
public string Password
{ get; set; }
}
}
Create one view "SecureLogin.cshtml" in
"Sitecore.Feature.Navigation" with below code
@model Sitecore.Feature.Navigation.Models.UserLogin
<!DOCTYPE html>
<html>
<head>
<style>
body {
font-family: arial;
font-size: 14px;
}
h1 {
margin: 0;
font-size: 20px;
font-family: arial;
text-align: center;
margin-bottom: 22px;
}
.loginContainer {
padding: 31px 28px;
width: 430px;
background-color: #7ad;
border: #ddd solid 1px;
margin: 100px auto 0;
border-radius: 10px;
-moz-border-radius: 10px;
-webkit-border-radius: 10px;
}
.loginContainer label {
color: #333333;
float: left;
line-height: 35px;
width: 80px;
clear: both;
}
.loginContainer input {
border: 1px solid #e7e6e6;
color: #333333;
float: right;
line-height: 22px;
padding: 5px 10px;
width: 310px;
margin: 0 0 10px;
}
.loginContainer input#BtnLogin {
background-color: #ddd;
color: #333;
cursor: pointer;
float: left;
font-size: 14px;
font-weight: bold;
margin-left: 18px;
width: 100px;
}
</style>
</head>
<body>
<div id="loginWrapper" class="group">
@using (Html.BeginForm("Login", "SecureLogin", FormMethod.Post))
{
<div class="loginContainer">
<div class="loginLogo"></div>
<h1>Login</h1>
<span style="color: #E60000; font-size: 15px;">
@Html.ValidationSummary(false)
</span>
@Html.Label("User
Name")
@Html.TextBoxFor(model => model.UserName)
@Html.Label("Password")
@Html.PasswordFor(model => model.Password)
@Html.Hidden("requestedurl")
<label> </label>
<input type="submit" title="Login" value="Login" id="BtnLogin" onclick="return checkForNullValues()" class="loginBtn" />
<div style="clear: both"></div>
</div>
}
</div>
</body>
</html>
<script>
function checkForNullValues() {
var Username = document.getElementById("UserName").value;
var Password = document.getElementById("Password").value;
if (!Username.match(/\S/)) {
alert("Username can not be blank");
return false;
}
else if
(!Password.match(/\S/)) {
alert("Password can not be blank");
return false;
}
else {
return true;
}
}
$(document).ready(function () {
var input = $('.input-validation-error');
if (input) {
input.addClass("validationchanges");
}
});
$(document).ready(function () {
$('#Password').bind('copy paste cut', function (e) {
e.preventDefault(); //disable cut,copy,paste
});
});
$(document).ready(function () {
$("form
input[name=UserName]").val("");
})
</script>
Create one controller “SecureLoginController.cs” in “Sitecore.Feature.Navigation”
feature as
using Sitecore.Configuration;
using Sitecore.Feature.Navigation.Models;
using System;
using System.Web.Mvc;
namespace Sitecore.Feature.Navigation.Controllers
{
public class SecureLoginController : Controller
{
// GET:
SecureLogin
[HttpPost]
public RedirectResult Login(UserLogin user, FormCollection form)
{
return Redirect(GetLoginURL(user, form));
}
private string
GetLoginURL(UserLogin user, FormCollection form)
{
string loginPage = Request.UrlReferrer.ToString();
try
{
if (Settings.GetSetting("SecureLogin.Enable").Equals("True") && user.UserName.ToLower().Equals(Settings.GetSetting("SecureLogin.UserName").ToLower())
&&
user.Password.Equals(Settings.GetSetting("SecureLogin.Password")))
{
loginPage =
Request.Url.Scheme + "://" + Request.Url.Authority + form["requestedurl"];
Session[Settings.GetSetting("SecureLogin.SessionName")] = "True";
Session.Timeout = 30;
}
}
catch (Exception exception)
{
Sitecore.Diagnostics.Log.Error("NavigationController > Initialize Exception", exception, this);
}
return loginPage;
}
}
}
Create a config “Feature.Navigation.config” at “App_Config\Include\Feature”
location to get value of different keys. You can create these values in Sitecore
dictionary as well, but I like to create them in config file. Below keys names
are self-explanatory as
<configuration xmlns:patch="http://www.sitecore.net/xmlconfig/" xmlns:set="http://www.sitecore.net/xmlconfig/set/">
<sitecore>
<settings>
<setting name="SecureLogin.Enable" value="True" />
<setting name="SecureLogin.UserName" value="steve" />
<setting name="SecureLogin.Password" value="jobs" />
<setting name="SecureLogin.SessionName" value="Success" />
<setting name="SecureLogin.RedirectPage" value="/securelogin" />
</settings>
</sitecore>
</configuration>
Check this session is exist for every request. Best place to
check this is header or footer as they are part of every page. I am placing
session check code in “PrimaryMenu()” action method in “NavigationController.cs” file as
public ActionResult PrimaryMenu()
{
if (Settings.GetSetting("SecureLogin.Enable").Equals("True"))
{
string sessionKey = Settings.GetSetting("SecureLogin.SessionName");
if (Session[sessionKey] == null || (Session[sessionKey] != null && !System.Convert.ToString(Session[sessionKey]).Equals("True")))
{
Response.Redirect(Settings.GetSetting("SecureLogin.RedirectPage"));
}
}
var items = this.navigationRepository.GetPrimaryMenu();
return this.View("PrimaryMenu", items);
}
In Sitecore
Create one Model item at “/sitecore/layout/Models/Feature/Navigation/LoginUser” and set Model Type value as "Sitecore.Feature.Navigation.Models.UserLogin, Sitecore.Feature.Navigation"
 |
| Sitecore Login Model |
Create one layout item at “/sitecore/layout/Layouts/Feature/Navigation/SecureLogin”.
Set Path for view as "/Views/Navigation/SecureLogin.cshtml" and insert link for above model as "/sitecore/layout/Models/Feature/Navigation/LoginUser"
 |
| Sitecore Login Layout |
Create “SecureLogin” item under Home item with any page template. Keep its icon as "Network/16x16/key1.png" to identify easily in content tree and assign
above layout in its Final Layout as
 |
| Sitecore Login Final Layout |
That’s it!!!
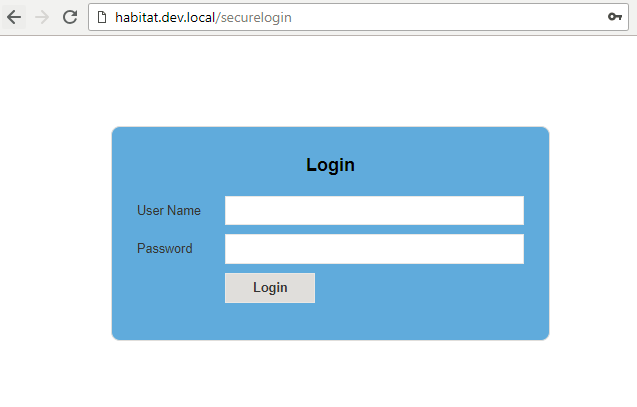
Now whenever any visitor tries to access public page, he
must have to authenticate via login screen.
 |
| Login Screen |
One last thing, while going LIVE, we must remove this login
screen by disabling it through “Feature.Navigation.config” file with below key settings
as
<setting name="SecureLogin.Enable" value="False" />
I hope you enjoy this Sitecore article. Stay tuned for more Sitecore related articles.
Till that happy Sitecoring :)
Please leave your comments or share this article if it’s useful for you.
Till that happy Sitecoring :)
Please leave your comments or share this article if it’s useful for you.


