If you are working with Sitecore JSS, you may require to
share some common data with multiple components.
If you are new to Sitecore JSS world, this article is for you. Here I am taking example of Tags
component to show tags in blog website.
For this you must create a template in Sitecore JSS
application at “sitecore\definitions\templates\KeyValue-Template.sitecore.js”
as
// eslint-disable-next-line
no-unused-vars
import
{ CommonFieldTypes, Manifest
} from '@sitecore-jss/sitecore-jss-manifest';
/**
* This is the data template for an individual
_item_ in the Tag's Content List field demo.
* @param
{Manifest} manifest
Manifest instance to add components to
*/
export
default function(manifest)
{
manifest.addTemplate({
name: 'KeyValue-Item-Template',
fields: [{ name:
'KeyValue', type:
CommonFieldTypes.SingleLineText
}],
});
}
You can add one or more fields in template function here.
On Sitecore JSS application deployment, this file will
create a template “KeyValue-Item-Template” in Sitecore with single field “KeyValue”
as
 |
| Tags Template |
Create some content items based on this template in Sitecore
JSS application at “data\content\Tags\ContentListField\Item2\en.yml” as
id: Tag-2
displayName:
Tag
# Template defines the available
fields. See /sitecore/definitions/templates/KeyValue-Template.sitecore.js
template:
KeyValue-Item-Template
fields:
KeyValue: Long
Tag
I have created 4 such tags files in Sitecore JSS application.
On Sitecore JSS application deployment, these files will
create items in Sitecore content tree at “/sitecore/content/my-first-jss-app/Content/Tags/ContentListField/Item2”
as
 |
| Tags Items |
Till this we have created shared items. Now its time to
consume these items in Sitecore treelist.
For this, add new component in Sitecore JSS application
using “jss scaffold” command.
I have added “BlogTagComponent” and its definition
file is located at “sitecore\definitions\components\BlogTagComponent.sitecore.js”
in JSS application.
// eslint-disable-next-line
no-unused-vars
import
{ CommonFieldTypes, SitecoreIcon,
Manifest } from
'@sitecore-jss/sitecore-jss-manifest';
import
packageJson from
'../../../package.json';
/**
* Adds the BlogTagComponent component to the
disconnected manifest.
* This function is invoked by convention
(*.sitecore.js) when 'jss manifest' is run.
* @param
{Manifest} manifest
Manifest instance to add components to
*/
export
default function(manifest)
{
manifest.addComponent({
name: 'BlogTagComponent',
icon: SitecoreIcon.DocumentTag,
fields: [
{ name: 'heading',
type: CommonFieldTypes.SingleLineText
},
{ name: 'tagContentList',
type: CommonFieldTypes.ContentList,
source: `dataSource=/sitecore/content/${
packageJson.config.appName
}/Content/Tags/ContentListField`,
},
],
/*
If the component implementation uses <Placeholder> or
withPlaceholder to expose a placeholder,
register it here, or components added to that placeholder will not be
returned by Sitecore:
placeholders: ['exposed-placeholder-name']
*/
// placeholders: ['jss-BlogTagComponent'],
});
}
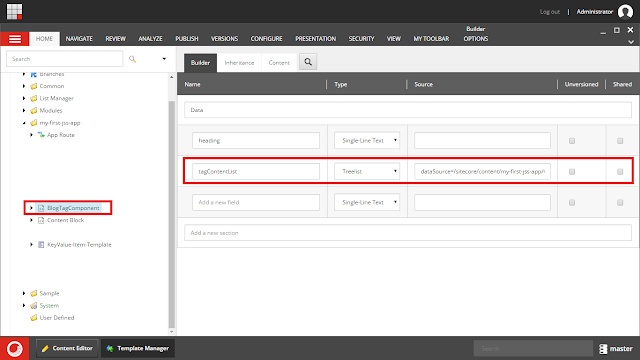
I have added two fields in BlogTagComponent – heading
and tagContentList.
Field “tagContentList” is specified in JSS
application as “ContentList” field type which is Treelist in Sitecore and I
set its data source at our Tags collection item.
After Sitecore JSS application deployment, this BlogTagComponent
file will create template item in Sitecore as
 |
| BlogTagComponent Template |
This scaffold command create one more file “src\components\BlogTagComponent\index.js”
where we can specify our HTML code as
import
React from
'react';
import
{ Text } from
'@sitecore-jss/sitecore-jss-react';
const
BlogTagComponent = (props)
=> {
const { heading,
tagContentList } = props.fields;
return (
<div
class="container
tags-topics">
<button
class="btn
btn-info">
<Text
field={heading}
/>
</button>
<div
class="card
bg-dark">
{tagContentList
&& tagContentList.map((listItem,
index) =>
(
<a
class="btn
btn-info" id={`tagBlogListItem-${index}`}
href="#"
role="button">
<Text
field={listItem.fields.KeyValue}
/>
</a>
))}
</div>
</div>
);
};
export
default BlogTagComponent;
To access all selected tags here, we have to iterate it
using “tagContentList.map((listItem, index) => ()” code. Inside
this map() function, we can access selected items one by one.
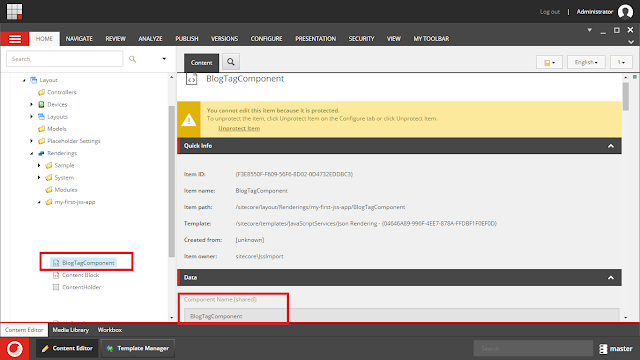
On Sitecore JSS application deployment, this BlogTagComponent
file will create rendering item in Sitecore as
 |
| BlogTagComponent Rendering item |
Finally, you should specify this BlogTagComponent in any
route file where route file is your page item in Sitecore.
- componentName: BlogTagComponent
fields:
heading: Tags,
Topics & Archive
tagContentList:
# see /data/content/Tags/ContentListField for
definitions of these IDs
- id: Tag-1
- id: Tag-4
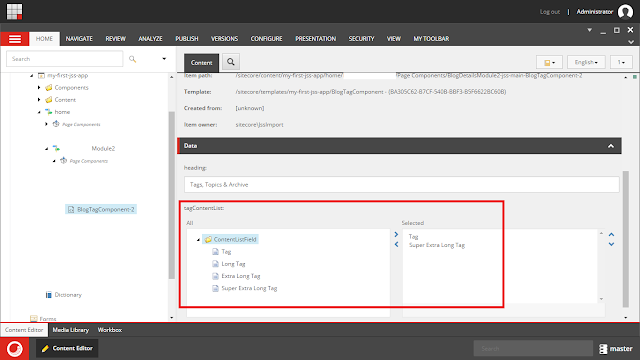
On deployment, this component will show in Sitecore under
page item as
 |
| Tags in BlogTagComponent |
As you can notice here we have selected two tags out of 4
available tags and that’s it.
Learning from this example - For any common and reused type
of content, always create shared list in Sitecore JSS based applications.
I hope you enjoyed this Sitecore JSS article.
Happy JSS 😉.


